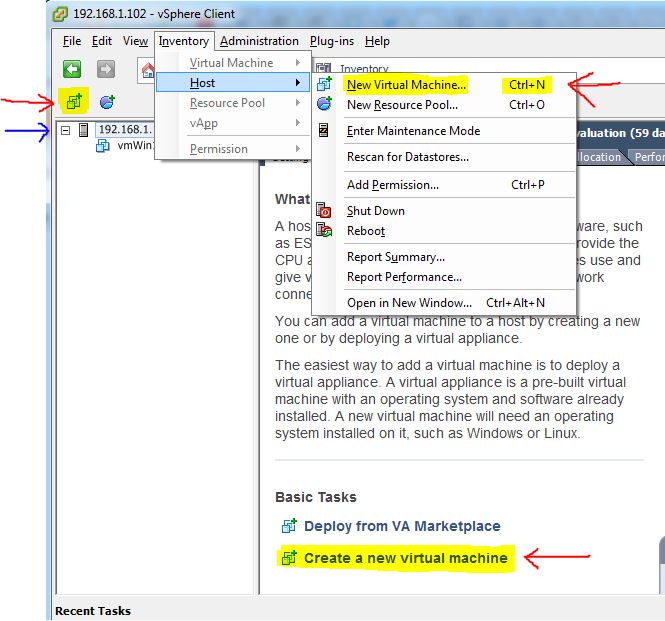
To make a new vm, you first need to left click on the Host we want to add a virtual machine to. For us since we only have 1 host that's easy and 192.168.1.102 down below. When you're managing many machines you'll have to select where you want the virtual machine to be stored.
Clicking the host changes the Inventory drop down to allow Host to be selected. We can then Select New Virtual machine. You can click anything that's Highlighted and has a red arrow. You can also right click on the host itself to bring up a duplicate window being shown.
TL;DR control+n for new vm
Pick Configuration Type. There's 2 options for this I'm going to choose typical on this occasion. The below image shows custom selected just so I can show you the different things you can configure in custom vs Typical.

Name your vm. In larger environments I'm sure this becomes obnoxious to find what you're looking for. I would suggest if you use a different subnet for servers, that you put that in the VM. This might help you find VMs faster and allow faster support when using vMotion. vMotion is a tool that allows shifting of VMs to different servers in real time while they're still running.This is best used when your vm's are stored in a SAN or somewhere OFF of the server you're going to put into maintence mode, but we only have 1 to test with right now.

Choose Storage for the vm. This is where the vm is being stored. Not how much hard drive capacity the vm itself will have access to.

Choose OS for VM. I believe this loads drivers so it's worth choosing something relevant, but I'll need to test if making a wrong selection matters at all.

Choose Network Adapter. I've heard vmxnet is a pain to deal with and almost never works. E1000e is new to me, no idea what it means vs the E1000. We'll go with the shorter one and cross our fingers. TODO Figure out why E1000

Create Disk space. This part gets interesting though. You choose some space less than the capacity of where you've placed the vm. You're basically making a harddrive just for your vm. However you look below and see there's 3 radio buttons, 2 for Thick Provisioning and 1 for thin provisioning.
Thick provisioning basically has ESXi to say allocate the full 40gb right upfront to my vm, even if the windows install is going to be less than 10 gigabytes to begin with. give me 40gb of concurrent sectors on the hard drive array. This partition says to remember I want a maximum capacity of 40gb sometime in the future, but only give me the disk space on the HD Array that I'm filling up. So installing a 10gb Windows OS would only lock up 10gb out the Raid Array now, but allow you to get more in the future. Really nice to have if you're not sure how much space you're going to need and don't want to start stealing all the Harddrive space for no reason but an expectation of use. However, if you do start using more than the 10gb, and you have thin provisioning on more than 1 vm, It will start putting your data at the first available place, you basically are planning to fragment your harddrive array.
I have no idea what Lazy Zeroed and Eager Zeroed means, but I can guess. Eager zeroed basically means format the disk by putting all Zeroes onto the partition we're allocating to the disk. This is basically a full format instead of a quick format. Not good for security because the data is still there, but if you use databases that actually look to see where the end of data is in a log file by finding where the zeroes begin, you'll need Eager Zeroed. This is a good thing, but time intensive. luckily I have the time now, and might not later so eager zero it is. TODO Confirm lazy zero/eager zero

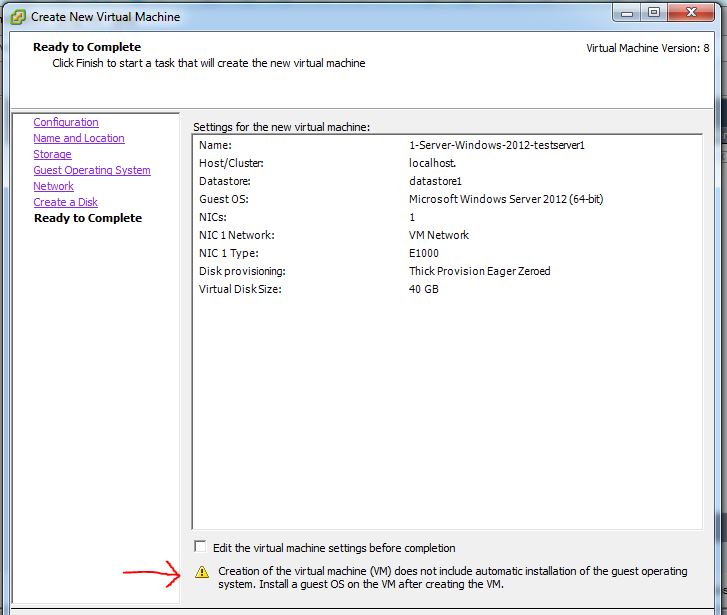
Finish the creation. When I first read the checkbox below, I thought it was effectively letting me save my settings for the vm to be provisioned later during Off-peak time however, that checkbox is something else. We basically ran a wizard on creating a vm and ESXI is going to guess at the system resources we need. To configure how many resources or "provisions" to give to our vm, we need to click the check box.
This will bring up the next window which is going to be a post on it's own continued in Creating a virtual machine (vm) on ESXi 5.5 for Windows Server 2012 (Part 2)

If you have any comments on the different network adapters and their pros/cons leave a comment below.
No comments:
Post a Comment