Provisioning the resources for our VM.
If you were born around the 80s you probably remember playing Oregon Trail where you're going out on your own and need to make sure you bring enough supplies for you to survive. Those were called your provisions and it's the same thing here. You need to assign resources for everything your server needs to have to be able to run on its own. Just a reminder on how to get to the VM properties: Right click the vm and goto Edit Settings. ESXi agrees with me and also puts the most important resource to worry about first.
Memory - RAM
If you remember Part 1 where we picked which operating system was going to be run in the VM helped ESXi decide on basic needs for your server. Selecting Windows Server 2012 gave us a base RAM of 4gig. In almost ANY bare metal server(as opposed to VM), especially with multiple vms your limiting factor is going to be RAM. I'm going to start my vm with 6144 mbs of RAM My Server came equipped with 12GiB of memory so we'll try something lower to allow us room to experiement with other vms at the same time. Hopefully I'll find some cheap RAM and upgrade the ram provisioned to the VM later. Next up...
CPU
CPU can probably be its own blog post. There's alot of things to consider about these 2 numbers. The first consideration is OS capabilities. Windows Server 2003 could only use 2 physical processors, Windows Server 2008 could only use 4 physical processors. In ESXi the equivalent is not vcores, but sockets. When you first load into the operating system, goto task manager and see how many processors you have loaded, a hyper-threaded processor should show as it's own virtual core but still be recognized by windows. For example choosing 8 sockets an 1 core per socket would show in windows server as 4 cpus because of the limit. However if you choose 1 socket and 8 cores, Windows Server 2008 would see all 8. Double check your OS AND your Application capabilities for multi-threading.
The main consideration of choosing cores/threads however is licensing. Starting with Windows Server 2012, Microsoft recognized that servers were being built with many sockets and each socket had a processor with many cores. A server could be built with 4 sockets, with 6 cores per socket and with hyper-threading giving a server 4sockets * 6cores * 2Threads =48 threads all running. Licenses started being based off how many cores your server was running and not just how many physical boxes you owned. Windows Server 2016 minimum pricing starts with 8 cores. Applications I think have started following suit and becoming a lot more common (SQL Server 2016 now only has core pricing). You need to determine what you've paid for before an audit. Don't risk having an audit and committing an RGE ( Resume Generating Event ).
Hitting complete, with eager zeros for 45gb vdisk took about 4 minutes to make on 4 7200 RPM Raid 10 drives.
Video Card -We're skipping, as a server we don't need much to deal with here. This is using onboard system memory from the dell r510 Matrox 200 video which is 16mb maximum memory capacity. If you're streaming a Youtube video on this server, prepare for a bottleneck.
VMCI Device - VM Communication interface VMCI provides a high speed communication channel between a VM and the hypervisor. It is optional to enable VMCI. I'm not trying to get my VMs to talk to each other through the hypervisor. So I'm skipping this as well
SCSI Controller - Set a policy to allow virtual disks to be shared SIMULTANEOUSLY between VMs. This is extremely useful if you have a SAN or some storage that's outside of the Server. As of right now we're just trying to get a Server running. TODO
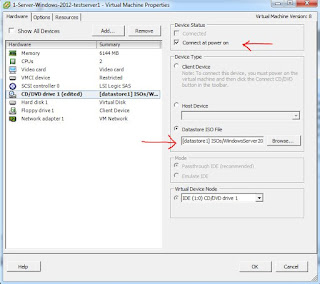
CD/DVD Drive - We're finally up to something we need to modify.
There's 2 things with pointers.
- The first is to Check Connect at power on. Since this VM has no OS installed we need to boot "from the cd" so we can install an OS. Can't do that if it's not connected when the VM first powers on.
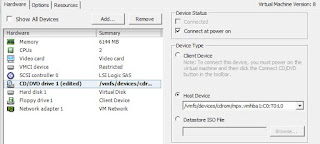
- The second is to select a source for the OS install files. I have an .ISO on datastore1 to use as the CD/image we're installing from. If you were installing from the cd player installed in the server whether that be a dell r510, or something else, you'd choose Host Device.
If using CD/DVD on server
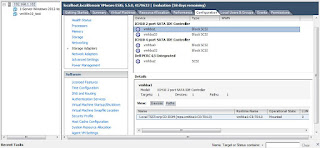
How to confirm what CD/DVD player is called/labeled on ESXI
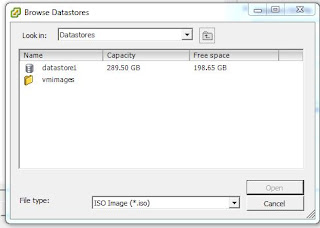
But we're installing from an ISO so we select Datastore ISO File. Get the following window and browse to our ISO directory and select the correct ISO.
If you don't have Windows Server 2012 R2 ISOhttps://www.microsoft.com/en-us/evalcenter/evaluate-windows-server-2012-r2?i=1
Get the evaluation copy from Microsoft. It's a 4.2gb download for Windows Server 2012R2. So have the space for it ready. This wasn't that quick of a download with an average of 2000kbps and starting at 1545 EST it finished at 1630.
You will need a Microsoft account do have access to the download. Any Hotmail or Outlook ID will work. You should have one of these anyway as alot of Microsoft's new services are moving to using their Microsoft ID as a login, like Office 365, PowerBI, Azure etc. You'll need to get used to using more than just your gmail/facebook logins.
Once that is mounted, and you've remembered to check "Connect at Startup" we can move onto the next section.
Hard Disk 1
There's not much to change here since we already configured how we wanted the Harddisk in the PART 1 section. You can confirm our settings however from this screen.
The bottom right I believe deals with snapshots and how much space to allow them to have or if the data generated when a snapshot is running and if software changed are persisted after a reboot. Warning This can be very dangerous if you set this wrong making changes you want to keep and losing them, so be careful and leave it alone if you're unsure what I just said.
Floppy Drives 1 - If you have one of these and are using it, goto your boss and give your 2 weeks notice. I do not miss Floppies
Network Adapters - An interesting section that we're not going to touch. Not as useful as SCSI controller, but not as worthless as Floppy. We're not changing anything as its all set to automatically detect what it needs.
We don't need to deal with the options and resources tab for now, the default settings should work. That's it, now we're ready to install Windows Server. Hope that helps a bit.
TODO-Talk about Options Tab and Resources Tab


No comments:
Post a Comment